System requirements for QuickBooks 2016 and Enterprise Solutions 16.0
QuickBooks Help
From the article: QuickBooks 2016 for Mac works with Intuit QuickBooks Payroll for Mac QuickBooks Payroll for Mac requires Internet connection and Adobe Reader to print checks and forms; additional fees apply System requirements for Intuit QuickBooks Payroll for Mac …
Record a journal entry in QuickBooks Desktop
QuickBooks Help
From the article: Detailed instructions Follow these steps to create a journal entry in QuickBooks Desktop: From the QuickBooks Company menu, choose Make General Journal Entries …
Choose General from the left side of the Preferences window.
Click the Company Preferences tab.
Select Decimal or Minutes from the Time Format section.
Decimal: QuickBooks Desktop automatically interprets time entries as decimal fractions; i.e. 7 hours and 30 minutes is represented as 7.5.
Minutes: QuickBooks Desktop automatically interprets time entries as hours and minutes; i.e. 7 hours and 30 minutes is represented as 7:30.
Change the date format:
To one you will need to change your settings in Windows (not in QuickBooks):
Windows 10
Tap the Start button, enter date and time in the search box, and click Date and Time.
Select Change date and time in the Date and Time window.
Tap Change calendar settings to continue.
In the Customize Format window, choose new date format.
Windows 8
On your keyboard, press Windows key + E to open the Computer window.
Go to Settings > PC settings > Time and language.
In the Date and time section, click on Change date and time formats.
From there you can configure the following options:
First day of the week
Short date
Long date For Windows 7
Open the Control Panel (icons view), and click on the Regional and Language Options icon, then close the Control Panel.
Under the Formats tab, select the format regional language that you want to use.
Change the date formats to how you want them displayed, and click on the Apply button.
NOTE: This will be for how the Short date, Long date, and First day of the week will be displayed as.
Click on the Additional Settings button.
NOTE: This will allow you to further customize the date format.
Click on the Date tab, and change the date formats to how you want them displayed.
When done, click on OK.
Click on OK again to finish.
QuickBooks Desktop Pro, QuickBooks Desktop Premier, QuickBooks Desktop Accountant, QuickBooks Desktop Enterprise, QuickBooks Mac Desktop, QuickBooks Point of Sale
How to track Job Time Costs for LLC members/owners that are not Employees? They are not on the payroll so they cannot enter time worked to jobs. But it is important to see how profitable the jobs are.
The idea here is to create a Zero-Journal bill to allocate time and effort to jobs without impacting on P&L report.
QuickBooks Setup (one-time)
In your QuickBooks chart of accounts create the following new accounts:
GO to Lists menu > Chart of Accounts > Account > select New
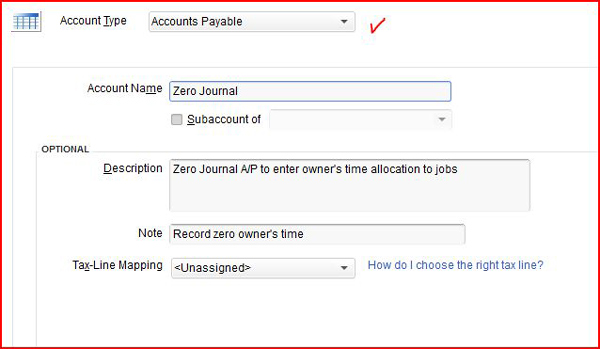
Zero Journal (under Accounts Payable – this is to differentiate this from operational Accounts Payable). Refer to Image # 1 for setup screen.
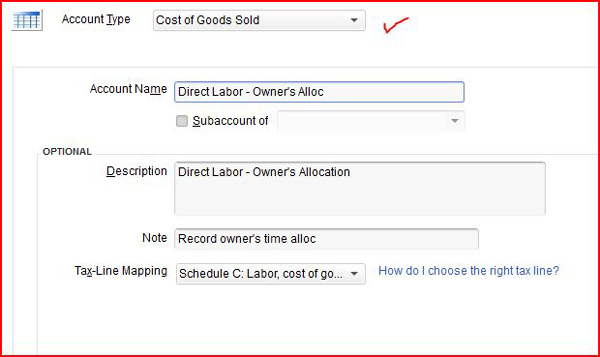
Direct Labor – Owner’s Allocation (under COGS). Refer to Image # 2 for setup screen.
Image # 1
Image # 2
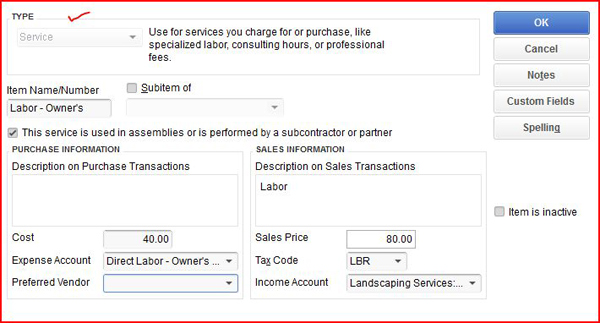
Service Item Setup
GO to Lists menu > Item List > Item > New > select Service
Type = Service
Item Name/Number = Labor – Owner’s
Check the box > This service is used in assemblies or is performed by a subcontractor or partner
Description = Leave it blank (if you put anything here, it will show up in job cost reports as lengthy unnecessary title/description)
Sales = Labor (anything you like to see in your invoice as description)
Cost = Hourly Rate (say $40 per hour for this example)
Expense Account = Direct Labor – Owner’s Alloc (under COGS)
Sales Price = Marked Up Hourly Billing Rate (say $80 for hour for this example)
Tax Code = Non-Taxable Labor
Income Account = Job Labor (title for income account)
Refer to Image # 3 for setup screen.
Image # 3
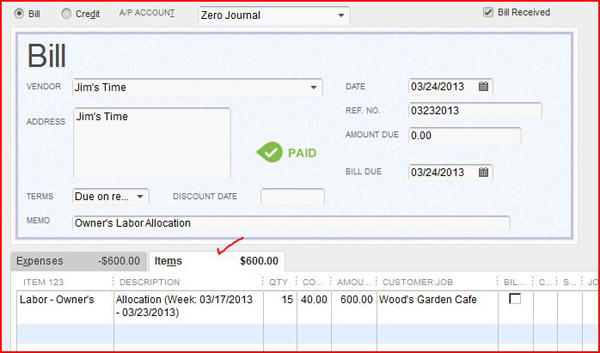
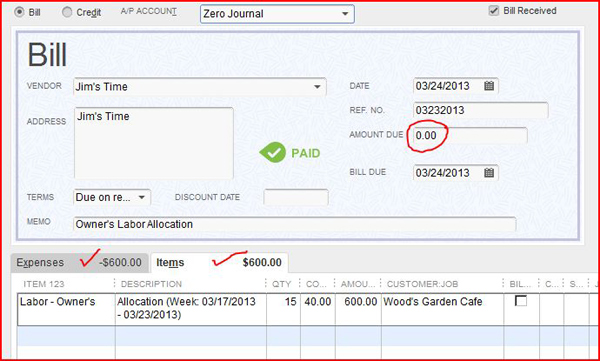
Enter Zero-Journal Bill for Owner’s Time Allocation
GO to Vendors menu and Select “Enter Bills”
Have a Weekly (or Bi-Weekly) Timesheet ready
Select Zero-Journal (NOT regular A/P)
Vendors = Owner’s Name (setup as Other Name)
Reference No. = Ending period of timesheet covered
Select Items tab
Select Labor = Owner’s from Item List (Service Type)
Description = Timesheet work period
Qty = Hours worked
Cost and Amount should automatically calculate (hourly rate was already setup as $40 per hour in this example)
Customer: Job = select Customer’s Name from Customer/Job
Billable = check billable box if it’s actually billable to commercial customer (optional)
Refer to Image # 4 for entry screen
Image # 4
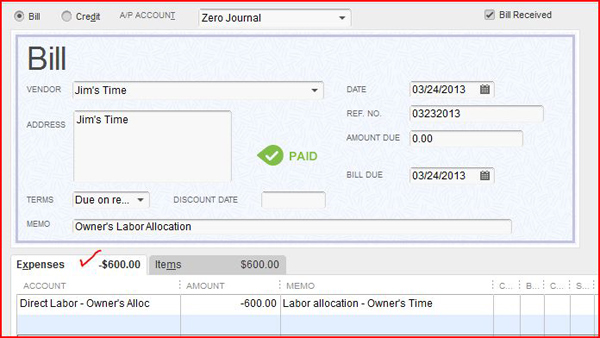
Select Expenses Tab
Account = Direct Labor – Owner’s Alloc (COGS account type)
Amount = Enter negative amount (in this example -600.00)
Memo = Labor allocation – Owner’s Time
Refer to Image # 5 for entry screen
Notice Expenses Tab & Items Tab
Should see negative amount (-$600.00 in this example) for Expense Tab
Should see positive amount ($600.00 in this example) for Items Tab
The net impact is zero journal entry with no impact to Profit & Loss account.
Refer to Image # 6 for entry screen
Image # 5
Image # 6
Now, let’s look at the various reports what will they turn out.
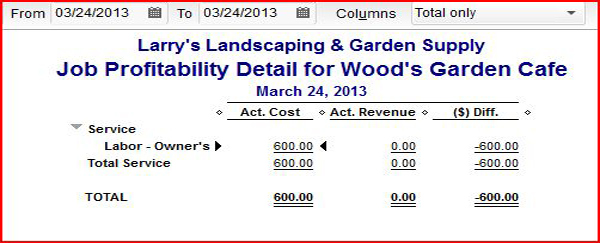
Job Profitability Detail Report & Item Actual Cost Detail Report for this Job
GO to Reports menu > Job, Time & Mileage > select Job Profitability Detail > select Customer
Refer to Image # 7 for report screen
Will reflect Owner’s cost of labor allocation for this job
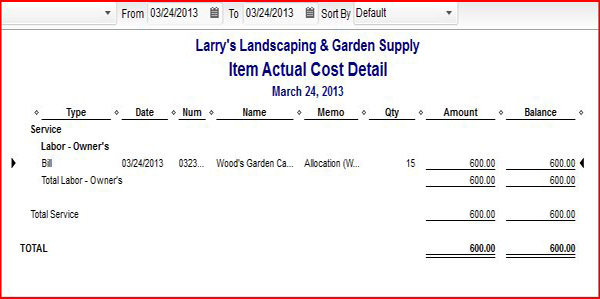
Double click actual cost dollar amount, it will take you to Item Actual Cost Detail Report. It will give detailed costs all the bill items entered for this job. Refer to Image # 8 for report screen
Image # 7
Image # 8
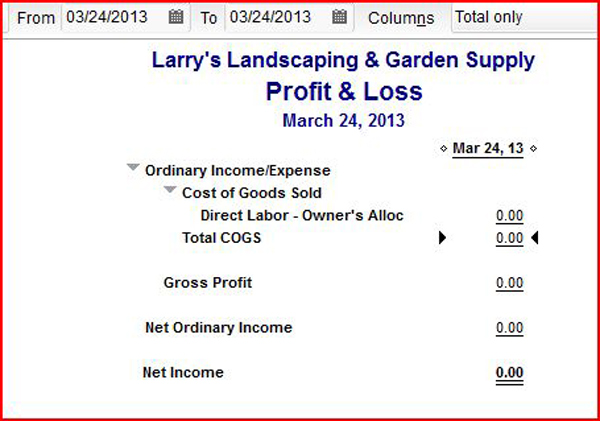
The big test is to see how it will come out in the Profit and Loss Report. See Image # 9 below. It shows no impact to P&L, and it zeroes out. It worked!
Image # 9
Please note that you should always run this past your CPA or Tax advisor to confirm it meets your needs, as we are not financial experts.


You must be logged in to post a comment.